Monday, December 27, 2010

.:Fortune cookies for the new year:.

Hi there everyone!
This is my first blog post for the Upsy Daisy design team blog, and I'm thrilled and nervous about it :)
Since the Christmas celebrations is over, its time to focus on the next big event this year... the New Years Celebrations. I have the cutest little idea for you to use at your party, Its a small paper Fortune Cookie. Aren't they adorable?


And I have a step by step tutorial for you today on how to fold these cuties. They are great for the kids treasure hunt, or as a fun way to wish all your friends a really happy new year.

well I better stop blabbing,,, here is the steps..
1.
Cut out a paper circle, the size of a Cd is great. Place one of the cut out paper circles in front of you. If you have a paper circle that has a pattern on only one side, place the pattern side down. Meaning, the side with no pattern should be visible. I have used the Avalanche paper line for this one.


2.
Fold the paper circle in half. You do not need to make a hard crease, just gently fold the bottom end up to meet the top. At this stage you can also put in a small paper ribbon or a trim to make your cookie a little more festive.


3.
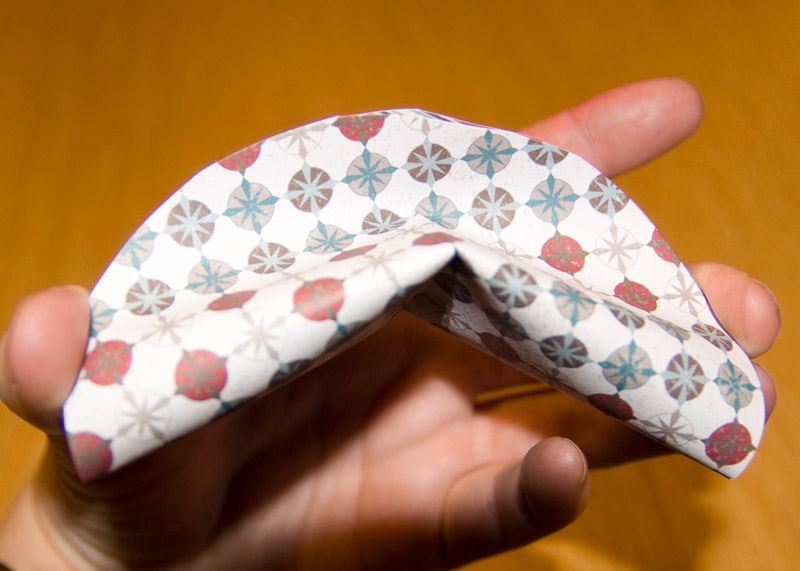
Take both outer edges and pull them down to meet each other. Once again, you do not need to form a hard crease, a slight tug downwards on both ends will form your shape. Your paper will now look like a fortune cookie.


4.
Add a dab of glue or a glue-dot where the two ends meet to secure them. In order to hold the shape of your fortune cookie the adhesive is necessary.


Make as many as you like, put them in a bowl as a centerpiece at the table, or give everyone a cookie together with the placing cards when you set the table.
Materials used: Avalanche- #AVA011-Adrenaline, #AVA014 -Powder, #AVA012- Extreme

Hope you all get a fantastic new year celebration!

//Katarina

Monday, December 20, 2010

Rub On Decorated Ornament

Hi Everyone! I am so excited to be here for my first official Upsy Daisy blog post! I have a step by step tutorial today to show you how to make an ornament with Upsy Daisy Rub Ons and Brads. It is super quick and easy and I think you will love how pretty it turns out.

First get yourself a package of plain glass ornaments. Second, choose a package of rub ons to decorate with. I chose the #UDD186. It's A Girl Thing
Cut each rub on you want to use (keeping the backing attached) into separate pieces. From this collection I cut apart all the decorative circles and flowers:
Then, one by one lay the rub ons onto the ornament and start rubbing! Once you place the rub on onto the ornament without the backing it will begin to stick, so be sure you know where you want to place them first.
Continue placing rub ons until you like the pattern of your ornament. Some of the bigger rub ons may wrinkle a little on the shape of the ornament--that is totally ok because we are going to add one more thing to cover those places.
Next, grab a package of coordinating brads. I chose #BRD311. BlossomRemove the brad wings by bending them back and forth several times (or cutting them with wire cutters or heavy duty scissors).
Fill the back of the brad head with some glue gun glue and adhere to your ornament. Add some ribbon around the top and that's it!
I love how pink and girly this one came out, but you can totally change the look by using a different collection of rub ons and brads! 
Before I go, I want to share one more holiday project. I made this layout about our advent calendar with the Avalanche line. I thought  the numbers from #AVA012. Extreme and the clock from #AVA015. Summit were perfect for a layout about counting the days until Christmas.
And to make the different edges for the accordion folded flowers? 

I simply used different border punches on the strips of patterned paper before folding them!
Hope you all have a wonderfully happy and healthy holiday season and a Happy New Year!
:) Rebecca

Monday, December 13, 2010

Holiday Spirit

The holidays are officially upon us! No matter where you look, there are decorations, shoppers, parties, gifts -- and lots of holiday spirit.

Today, I'm going to share with you a few holiday-inspired cards, along with a little gift idea I discovered this year.

First up, a card I created by mixing papers from AVALANCHE, HOME SWEET HOME and SEE YOU LATER ALLIGATOR.

UDD Products Used
Papers: #SYLA013. Everglades, #HSH015. Midland Ave, #AVA014. Powder


I really love how all the colors mesh so well together, even though they're from different lines. And since I was in a cardmaking kind of mood, I created this card from the HOME SWEET HOME papers:

UDD Products Used
Papers: #HSH016. Rockland Rd, #HSH014. Maddison St


I'd never realized that the colors in this line are traditional holiday colors...just with a different twist!

So I have the cards, now I need a gift to go with them! A few months ago, I found this wooden perpetual calendar from Queenvanna Creations on Etsy.
I thought it would make a great gift, so I started altering it with papers from the VOGUE collection. I love this collection for home decor because the colors are so preppy and stylish. I'm so happy with the way it turned out.

I cut the words out of black vinyl with my Silhouette, and I cut the numbers from cardstock with my Cricut. I outlined the white numbers with faux stitches with a black glaze pen to make them pop.

UDD Products Used
#VO011. Catwalk, #VO012. Chic, #VO013. Diva, #VO014. Fashionista, #VO015. Runway, #VO016. Strike a Pose

Now the only problem is: I don't want to give it away! I want to keep it on my desk and happily change the block each day. Is that wrong?

Hope your holidays are filled with the spirit of giving! Enjoy!

Robyn

Monday, December 6, 2010

Monthly Sketch - December 2010

Can you believe that we are as good as at then end of yet another year? It amazes me just how much time flies these days...I swear it was only a few weeks ago that we all enjoyed the Summer, no???

But I digress - it is time to say good-bye to a long standing friend of ours: the monthly sketch. 
We have all enjoyed to play along to the sketches and I hope you got some inspiration out of them, but it is time for something new. 

With that being said, we hope that you all play along with us this month and celebrate our ultimate sketch in style.

** click on any of the images to enlarge their view **

I decided to take my favourite holiday line HOT CHOCOLATE and create a totally non-Christmas layout. Don't you love it when you have such a versatile paper line that can be used for any occasion?
UDD products used:
Papers#UDD0151. Cocoa, #UDD0155. Wintergreen, #UDD0153. Frosted

By the way - our Christmas Lines are ON SALE right now HERE and HERE...be quick though, as stock levels are low already

JULIA created two stunning cards from the sketch, mixing quite a few paperlines. The attention to detail is mind-blowing - just look at that wreath! And Julia also created a wonderful layouts for the sketch too
UDD Products used:
Papers: #AVA015. Summit; #WP015. Majestic; #UDD0147. Take wing; #UDD0149. Freedom; #HSH016. Rockland Rd; #HSH015.Midland Ave; #AVA014. Powder; #UDD0135. Sprinkles; #UDD0156. Giving; #UDD0159. Peace;

MELISSA made perfect use of our AVALANCHE paper and created this fabulous layout - indeed a picture perfect!
UDD Products used:
Papers: #AVA013. Grind; #AVA014. Powder; #AVA015. Summit; #AVA012. Extreme 

TRACEY also used AVALANCHE and I adore just how different it looks! Gotta love the versatility of Upsy Daisy Designs Papers
UDD Products used:
Papers: #AVA011. Adrenaline; #AVA014. Powder; 


KATARINA created this amazing layout. Who would have thought that VOGUE is perfect for winter themed projects?
UDD Products used:
Papers: #VO011. Catwalk; #VO012. Chic; #VO014. Fashionista;
Rub Ons: #UDD191 With Gratitude. 


MARIELLE dug into the HOME SWEET HOME and AVALANCHE collections and created two wonderful layouts
UDD products used:
Papers#HSH011. Alma; #HSH013. Cedar Cres; #HSH014. Maddison St; #HSH015. Midland Ave
Brads: #BRD316. Home Sweet Home 

UDD products used:
Papers#AVA011. Adrenaline; #AVA012. Extreme; #AVA014. Powder; #AVA015. Summit


Meanwhile JANIS produced this funky layout of her sweet Santa Babies using our HOT CHOCOLATE line
UDD products used:
Papers#UDD0155. Wintergreen, #UDD0153. Frosted, #UDD0152. Dash Away, 
Brads#EMB006. New Day 

GRACE also played with HOT CHOCOLATE this month and created this beautiful set of cards

UDD products used:
Papers#UDD0155. Wintergreen,  #UDD0152. Dash Away, 
Brads#BRD311. Blossom 

SANDI made use of the SPIRIT line to create this wonderful layout


UDD products used:
Papers#UDD0158. Love,  #UDD0156. Giving, 


So, what do you say? Are going to join us for one last time and play along?
If so , please link us in the comments section to your layout so we can visit and leave you some Daisy love


But before we go - please join us in sending us best wishes to our very own KATARINA who celebrates her Birthday today!!!
Happy Birthday Katarina - may all your wishes come true. Stay healthy and safe.