Showing posts with label Sandi Counceller. Show all posts

Monday, January 10, 2011

Fun Bubbles!!

When crafters see the “Avalanche” papers from Upsy Daisy Designs, they immediately think “snow”, right?
Well I thought “BUBBLES!”

I found a really cute bathtub board book at the craft store to use, but you can use bubbles on layouts or cards or any other project.


I wanted to think of different ways to make bubbles for my “Fun Bubbles” mini book.

(1) I punched holes in parts of the blue shades of the Avalanche papers and some from cardstock.


(2) Then I wanted to “decorate” the bubbles different ways. I used gems, stickles glitter and paint, and the Upsy Daisy Clear Stamps “Make a Bloom.”

 
(3) After decorating my “bubbles”, I used a clear-drying glue on top of each one…. (you can use the Glossy Accents or Gloo, or any other clear-drying liquid glue). Cover each bubble you designed with the clear-drying glue and let dry completely.


(4) Attach them to your project with whatever adhesive you choose.


(5) I also used a few of the round Upsy Daisy Designs brads for some of the bubbles!


(6) For the large bubble on the cover, I actually used a clear nail polish I found with sparkles and tiny hearts that were already mixed in the clear polish.


There are so many ways to make your own bubbles!  Have fun using papers from all of the Upsy Daisy Designs patterns to make your own bubbles!!


Monday, October 11, 2010

Fall Project!

HI everyone!

I decided to do a fall project with Upsy Daisy Designs products and it was so much fun!  The neat thing about this project is that it could be used as a gift, a centerpiece, or a candle holder.  I decided to make a cute centerpiece....

I used my curvy blade on my paper trimmer to cut strips from a piece of the "A Walk in the Park - Beautiful" paper.  I left the strips attached at the top about 1/2 inch and then hot-glued them around the top of the container and the bottom, making them "bulge" out in a pumpkin shape. 

I  then added white ovals and the Upsy Daisy Designs black brads for eyes, an orange button for the nose, and Upsy Daisy Designs thick rick rack ribbon for the mouth. 

I wanted my pumpkin to be a girl, so I made thin strips with the "Splendid" paper from the same paper line, and spiral wrapped them around a thin pencil to create curls.  I added the green Upsy Daisy ribbon around the top of the container, and also added an orange UDD bow for her hair. 

Then I went to work on the scarecrow!


For the scarecrow, I just cut out two sides of a shirt and used strips of Upsy Daisy Designs paper to make his clothes...(yes, I really sewed them together with the sewing machine!)  Then I stuffed raffia into the doll and glued him together and attached him to a dowel rod.  I added some ribbon for a bow and hat, a scalloped edge on his shirt with a little glitter glue... and that was it!

I also used the wonderful Helmar Adhesives for this project!

I think it turned out really cute!  The Upsy Daisy Designs papers are so versatile for any season... which is one of the reasons I love them so much!  Hope you like it too!

Monday, August 9, 2010

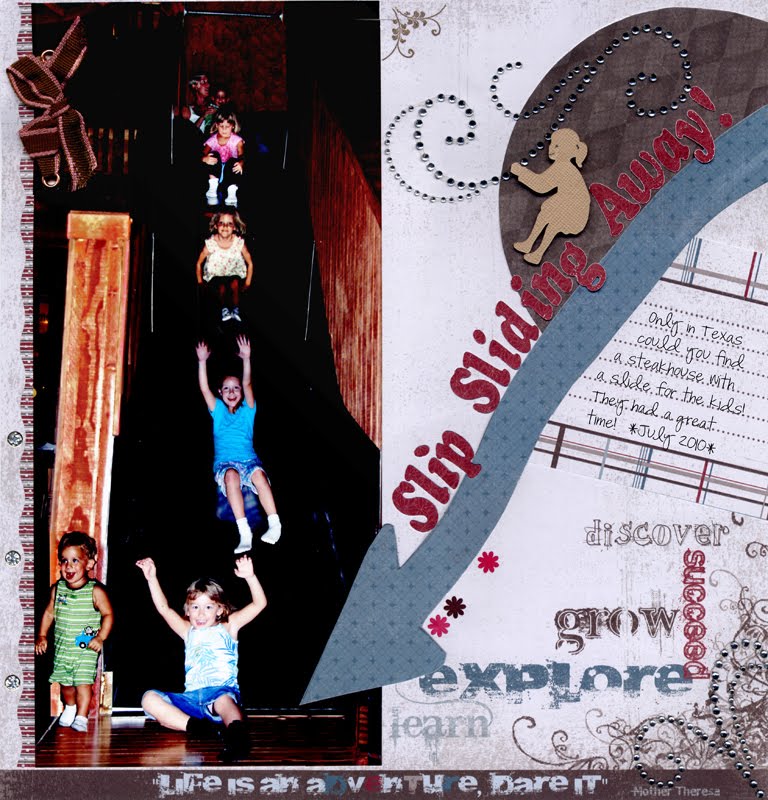
Slip Sliding with the new "Avalanche" papers from UDD!

One of the things I love about the new "Avalanche" line by Upsy Daisy Designs is that it is so versatile. Sure, there is a snowflake paper, but there are also great stripes, plaids, and patterns! It's really about scrapping an adventure....

We visited Texas this summer to spend time with my two sisters, their children, and my parents. We went to a steak house (of course!) and what did we find? A big SLIDE! The kids were thrilled. I edited a lot of the pictures in Photoshop so I could put all of our kids on the slide at the same time. Hope you have fun looking at my results!

UDD Products Used: Avalanche Papers, rub-ons, and ribbon.

Monday, August 2, 2010

Monthly Sketch - August 2010

Welcome to August - I hope you are enjoying your summer, even though the days are already getting shorter.
Then again, that gives us more time to spend in the craft room, right?

If you need something to kick start your mojo, why not have a look at this months' sketch and the DT Examples (you can enlarge the view of each image by clicking onto it). We were all very excited to get creative with the new lines AVALANCHE and HOME SWEET HOME.

I fancied using the winter-based papers from AVALANCHE first, probably because it is so hot here that I could do with a little cooling down :)

UDD Products used:
#AVA015. Summit; #AVA014. Powder; #AVA012. Extreme


ANDREA shows us that papers with a winter theme are perfect for any season with this fun layout of her son (I whole heartedly agree with Logan's love for jelly beans, by the way)
UDD Products used:


TRACEY chose to use papers from HOME SWEET HOME and did she not do amazing? Fantastic layering and the tree is such a fun element.
UDD Products used:

SANDI also used HOME SWEET HOME to create this gorgeous layout focussing on family. Isn't the title fabulous?

UDD Products used:
#UDD124. Classy Brown Alpha Rub Ons

GRACE also made use of the HOME SWEET HOME line and created a wonderful set of cards based on the sketch. Aren't they just fabulous?

We hope we were able to inspire you with our take on this months' sketch. Why not play along with us and link us to your take on the sketch in the comments section? We would love you see what you create and leave you some love.

Don't forget that we have a DT CALL going and that you can also stay on top of everything Upsy Daisy Designs through our FACEBOOK page.

Friday, July 30, 2010

A Beautiful Birthday

For one of this month's projects, I used the "Vogue" papers that I love so much to make a birthday card.  My daughter turned the big infinity (eight) this month, so I've had birthdays on my mind!
The most challenging and also fun part of scrapbooking or card making for me is to use many elements (embellishments, techniques) and still have the project look simple, detailed, and beautiful.

This card includes hand stitching, rub-ons, a ribbon punch, hand-cut flowers, marker, ink, brads, pop-up dots, and texture paint. I still have a lot of white space and the design flows beautifully. I used two colors of thread for the hand stitching (silver and green) to create a little "whimsy."

This is one of my all time favorite cards... so I hope you like it too!
Upsy Daisy Designs Products Used: "Vogue" Paper Line, rub-ons (circles, flourish, and small flowers), brad (top left).

Tuesday, May 18, 2010

Past and Present...

For this week's layout, I really wanted to do a past/present layout and realized I had these two beautiful photos of my daughter, one taken at age three and one taken this year at (almost) age 8. They are both face shots of her with her dance costume and makeup on, which made them "match" visually.

The soft look of Upsy Daisy Designs "Blossom" paper line was perfect for this layout, but I also mixed in some from the "Enchanted" line (the background) and the "Cupcake" line (the pink). Some of the larger pink and brown circles are from the "Circle of Friends" Upsy Daisy Designs line. It was fun to see how well these papers looked together .... and also realize how much just my daughter's face has "matured" in 5 short years!


I also used Upsy Daisy Designs rub on letters (in brown) for most of the title and some rub on flowers that were also included on the "Basic Brown Alpha" rub ons.  The stamp you see under the title "Dance" is an Upsy Daisy Designs clear stamp (love those!!) from a pack called "Floral Flourishes."  I used my sewing machine for the light brown zig-zag edge on the left of the pink paper.  I like it when layouts look pretty and simple (or classic) but they also have some little unique touches to make them more interesting than at first glance.

Hope you like it!

Monday, March 22, 2010

Bring on the Spring!


I grew up as a child mostly near Chicago – and boy did we have snow!  Needless to say, when our family finally moved to Atlanta when I was in 6th grade – I was so glad to be done with snow!  Of course, not many people realize that Atlanta winters can be very cold, windy, and just plain yucky.  A few years ago, my husband and I lived in Tucson, AZ and we loved it!  I told my daughter (who was 4 at the time), “Oh honey, we won’t get snow here in Tucson… it’s the desert.”  Well, I was proven a “silly mommy” when we had 3-4 inches of snow for just one day in Tucson.  I couldn’t believe it!  I had to go out and take photos of the cactus with snow on them!
Soon after, my husband was transferred to Atlanta and I was not thrilled to leave the warm Arizona winters (except for the ONE day of snow!) and the beautiful sunsets.
So today, on one of the first days of spring here in Atlanta, I wake up and we have snow flurries.
I am so thrilled that our projects for Upsy Daisy Designs this month include the new “Blossom” line!  If it doesn’t feel like springtime outside, it can feel like it in your scrap space with these beautiful papers!!  I decided to make some springtime cupcakes that I saw in an idea book with the “Blossom” papers, and also a springtime layout (the layout is below in Kim's post).  Hope you enjoy them and are having springtime weather soon!!


Monday, January 11, 2010

2010 - A Big Year!

I knew it would be here sometime - the year I turn 40.... augh!!  At least my husband just turned 50 on New Year's Eve... :-).  I really wanted to do a layout about this "big year" in our ages.  We were married in 1996, when I was 26 and he was 36.  We looked so young then!

It's fun to look back at older photos during a milestone year like the number "2010".... there are so many layouts you could do that look back on 10, 20, or 30 years or more.

Don't forget to also make some great memories in 2010!

UDD Products used:
"Man About Town II" Patterned Papers
#UDD210. "My Guy" Stamp Set
#UDD209. "Girl Friends" Stamp Set (for the circle by the photos)
#EMB004. "Man About Town" Metal Brads

Monday, November 9, 2009

"Snow at the Beach" and "Angel" layouts

I am very excited to post my first blog entry for Upsy Daisy Designs!  What you can't afford to miss with the releases from Upsy Daisy Designs are the great selection of patterned papers that coordinate so well with each other, but still allow you to show your own style in your scrapbook layouts. 

"Snow at the Beach"  12x12 Layout 


Below, I utilized the "Hot Chocolate" collection to create a layout with somewhat difficult photos to scrap.  The pictures are actually from a Caribbean island, Disney style!   We went on a Disney Cruise last time my husband came back from Afghanistan in 2005.   It was December, so at Disney's private island, we were at first surprised to see "snow" and huge Christmas decorations, but of course, that is what you should expect from Disney, right?

It was actually windy that day, so Kayla had a little red jacket on over her swim suit, which turned out perfect for a Christmas color-themed photo.  The decorations had a lot of pink in them as well, which made the Upsy Daisy Designs "Hot Chocolate" papers so perfect for these photos!  I also utilized a clear journaling stamp from the UDD "My Guy" set, and beautiful jeweled brads from UDD ("Bebe Girl").   And yes, that is flocking on the title that I cut with my die cut machine!  I love to mix patterns, so that is what I did for the little accents around the page.  Hope you like it!


UDD Products Used:
#UDD0151. Cocoa
#UDD0150. Cinnamon Stick
#UDD0152. Dash Away
#UDD210. My Guy Clear Stamps
#EMB002. Bebe-Girl Jewel Brads
#EMB004. Man About Town Brads

"Angel" 12x12 Layout

For my second layout, I was thrilled to use the Upsy Daisy Designs "Spirit" collection!  RED is my favorite color, so I love it when I can use it somewhere in my layouts.  When I first saw this angelic paper in the "Spirit" collection, I thought of the perfect photo I had from when my daughter, Kayla, was three.  This picture was actually taken on her third birthday.  She received a "ballerina" dress-up outfit, and in this photo, she really does look like an angel.

I edited this picture in Photoshop (I use CS3, but I believe you can do the same thing in Photoshop Elements).  First, I created a background layer that was black, and then I carefully erased the photo layer all around Kayla to get rid of a distracting background.  I used a softer brush for the erasing, with some more intricate parts using a little "harder" brush.  I also used a lighting filter so that her face would really "light up".   

After I was pleased with the look, I scanned in the angel from the Upsy Daisy Designs "Spirit - Peace" paper.  I then used the Photoshop "magic wand" selection tool to select just the wings from the paper scan, and dragged them in to my picture.  I then played with filters and opacity, and also changed the size and rotated the wings a bit to make the look how I had pictured it in my mind.  I had to erase some parts of the wings, as this was my top layer, and I wanted the wings to look really subtle. (Because my daughter is not really an angel in heaven, but to me, an angel here on earth! :)

After the photo looked right I printed it and matted it on the red "Spirit-Love" paper, making sure to keep the beautiful white snowflake pattern on the mat. Next, I used a larger piece of more of an off-white patterned paper (also from the Spirit line), and I printed my quote right onto the patterned paper.  I used a few different fonts and text colors to highlight appropriate words in Photoshop CS3, and then I printed it on a plain "practice" piece of paper to see if it lined up correctly.

After printing the quote, I went to carefully cutting out the angel from the patterned paper.  I used a "fingertip" blade which I think works really well on a self-healing mat.   Then I used the S-shaped filigree UDD clear stamp from the "My Guy" set to stamp a border in white ink across the top of the red paper.

I finished by highlighting some of the angel and paper designs with whit, gold, and silver pens, as well as pink soufflé markers, used a UDD rub-on near the angel's horn, and scattered a few clear star jewels around the text.  I used some pop dots under the top angel wing and the horn, and added a few more embellishments, including a "love" circle stamp and heart shaped rub on... also from UDD, with embossing powder.  I matted it all on a piece of patterned cardstock from the UDD "Hot Chocolate" line (I just love scallops!!)... and that's about it!  This is one of my favorite layouts!


UDD products used:
#UDD0158. Love
#UDD0159. Peace (front and back)
#UDD0153. Frosted
#UDD208. Chic Bebe Clear Stamps (LOVE circle stamp)
#UDD210. My Guy Clear Stamps
#UDD185. Baby Love Rub Ons
#EMB004. Man About Town Brads

I know this is a long post, but I hope you get some helpful tips for your layouts!  Upsy Daisy Designs paper can be hard to find here in the U.S., so ask your local store to carry it or order some online...you won't be sorry with the quality, double-sided cardstock and patterns that are available... as well as the clear stamps, rub-ons, and beautiful brads!