We all have different things that we are thankful for, right?
One of my major important things in life (apart from health and love, mind) is Music - I could not function without it.
Which is why you would never find me out and about without my trusted iPod.
To ensure it stays nice and neat I actually carry it in my handbag in the sturdy plastic container it came in - but after a while the plain white covers bored me.
So I took a sheet of #AVA014. Powder from the AVALANCHE line and a piece of left over paper #BLO014. Precious from the BLOSSOM line to make this:
It did not take long to trace the outline of the original white cover and I simply glued the paper straight onto it. A few Helmar Zapdots later and the circles were raised from the background and gave some additional dimension.
So, tell us what are you thankful for?
Monday, September 20, 2010
Monday, September 13, 2010
Clouds
Hi there, it's me Julia Saddi : ) and today I come to share with you girls few clouds of my very own style. Hope you all like and try them out. If you have any doubts while making clouds like the ones I am going to show you today, feel free to get in contact with me: reach_ju@hotmail.com. And, if you have great ways of making different clouds, all by yourself, on your very own style, please share with us just leaving the exact blog post address under your comment on this post, we'd appreciate it!
Materials:
- Upsy Daisy Vogue Collection
- 2 White Cardstocks
- 1 Riptide Blue Glimmer Mist or similar
- White Fabric Puff ink
- 1 Post-it full adhesive Craft Paper size A4
- Sun: either a die-cut or an embellie made by yourself
- Whatercolour tubes
- Fine brush
- Small Yellow Alphabet
- Precision Scissors
- Blue Bottons
- Ribbons
- Color markers
1. Masks' Negative Technique:
First of all, you should either draw or find a cloud set pattern you may like to work with. Here I used an old cloud set pattern I keep on my patterns' box. I drew them on a Post-it full adhesive Craft Paper size A4, cut them out with a small precison scissors, then peeled the non-sticking paper on the back of them. Next, I glued the clouds on the top of a white cardstock, 'cause they should work as a mask negative on my project. First two photos:
After arranging the clouds on the white cardstock, I srayed riptide blue glimmer mist around all the area where I chose to be the sky on my Layout. You can take the excess ink, if you want, by gently tapping a clean white napkin onto it. After the glimmer mist has dried, you can remove the clouds' masks. The result will be like shown on the following photos:
Bellow you can see the whole Project in which I used these Clouds' Masks Negative:
2. Glimmer Mist Sray: I copied the clouds' patterns on the top of an UDD paper that I LOVE 'Vogue Fashionista' , sprayed glimmer mist on the top of them, waited for them to dry, cut them out and used on a Card Project, like shown belllow:
Title with Upsy Daisy alphabet rub-ons
3. White Fabric Puff Ink applied to Scrap and Card Making: at this time I pulled out of my patterns' box a huge cloud, drew it on a cardboard, cut it out, glued UDD New Paper #AVA014 Powder onto it, then cut off all the excess paper. To soften the blue and give a certain touch of reality into the big cloud, I painted the top of it using white watercolour tube, fine brush and white napking to suck/drie the excess water. Right after this, I circled the outer cloud with White Fabric Puff Ink and dried the puff ink with an emboss heat gun. Kept it aside. I drew a small cloud on a scrap of Fashionista paper, did not use any watercolor, but also used puff ink - same process. Then I fixed the smaller cloud with foam tape over the bigger cloud. Glued ribbons on the button of the big cloud, glued blue doodlebug buttons and a die-cut sun. Chose a simple title for all occasions: Hi! and attached a thin waxed ribbon to it. Voilá! Last photos:
At the back of the card, I made some doodles at the border
and lines to be written on.
If you like it, please leave a comment! : )
1 Huge Hug to each one of you, Love, Julia Sáddi

Monday, September 6, 2010
Monthly Sketch - September 2010
Good morning and welcome to September!
Time sure flies and after a somewhat very unpredictable summer here in the U.K. we can almost touch Autumn....
One of Upsy Daisy's new paperlines HOME SWEET HOME is perfect for the approaching new season and hopefully our monthly sketch will provide you with some additional inspiration on how to use your favourite Upsy Daisy Designs products.
** click on any of the images within the post to enlarger their view **
Our DT Members could choose which of the two new lines they would like to use for the above sketch and I decided to stick with my Autumn mood and grabbed the HOME SWEET HOME collection.
Papers: #HSH015. Midland Av; #HSH016. Rockland Rd; Brads: #BRD311. Blossom; #BRD312. See You Later Alligator
How amazing is this layout by JANIS? I love the depth she achieved by layering the wonderful papers from our BLOSSOM line
Papers: #BLO011. Awakening, #BLO014. Precious, #BLO012. Freshly Picked, #BLO016. Spring is in the Air, #BLO015. Spring Breeze
Rub Ons: #UDD0123. Basic Brown Alpha
GRACE created this fantastic layout, using AVALANCHE, and made the sketch work for her by using straight lines for her frames, perfect!
Papers: #AVA013. Grind, #AVA014. Powder, #AVA015. Summit
Brads: #BRD314. Metallic Blossom
TRACEY made a wonderful set of cards using HOME SWEET HOME. Isn't it fantastic how she hand cut some of the patterns from the #Alma sheet to make them pop as stand alone elements? Simply gorgeous!
Papers: #HSH013. Cedar Cres, #HSH011. Alma
How fabulous is this layout created by SANDI? Using AVALANCHE, I love how Sandi stuck to the blueprint of the sketch and also added those adorable tags.
Papers: #AVA013. Grind, #AVA014. Powder, #AVA016. Wipeout, #AVA012. Extreme
Stamps: #UDD0106. Floral Flourishes
We would love to see you play along with our sketch - please link us up to your creation within the comment section, so that we can leave you some Upsy Daisy love...
And before I go, don't forget our DT CALL - there are still some days left to get your application in. We have already received many wonderful entries but we would like to see yours (yes, YOU there looking at the screen right now) in our inbox as well :)
You can also hook up with us on FACEBOOK and if you fancy winning some Upsy Daisey Designs goodies, check out the September Challenge on CREATIVE PROMPTS FOR YOU.
Monday, August 30, 2010
SHARING SOME AVALANCHE LAYOUTS
Hello everyone! I got to play with Upsy Daisy's Avalanche papers lately and was able to create two layouts. I thought that even though they are winter papers, they are very versatile enough to be used on boy pages!
My first layout is my entry to Journaling Junkie's Challenge 86: What Comforts You?. You can find the details of this layout on my blog HERE.
UDD Supplies Used: Papers: #AVA011. Adrenaline, #AVA012. Extreme, #AVA013. Grind, #AVA014. Powder, #AVA015. Summit, #AVA016. Wipeout, Fabric Brads: #EMB007. Walk in the Park, Stamps: #UDD209. Girl friends.
My second layout used the sketch for the month that you can find HERE. I also took inspiration on the strip that you can find on the #AVA013. Grind paper.
UDD Supplies Used: Papers: #AVA011. Adrenaline, #AVA012. Extreme, #AVA013. Grind, #AVA014. Powder, #AVA015. Summit, #AVA016. Wipeout, Fabric Brads: #EMB007. Walk in the Park.
I cut them out as strips and adhered them with pop dots for added dimension.

Hope you like what I shared with you today! Until next time!!!
Have fun creating,
janis
My first layout is my entry to Journaling Junkie's Challenge 86: What Comforts You?. You can find the details of this layout on my blog HERE.
UDD Supplies Used: Papers: #AVA011. Adrenaline, #AVA012. Extreme, #AVA013. Grind, #AVA014. Powder, #AVA015. Summit, #AVA016. Wipeout, Fabric Brads: #EMB007. Walk in the Park, Stamps: #UDD209. Girl friends. My second layout used the sketch for the month that you can find HERE. I also took inspiration on the strip that you can find on the #AVA013. Grind paper.
UDD Supplies Used: Papers: #AVA011. Adrenaline, #AVA012. Extreme, #AVA013. Grind, #AVA014. Powder, #AVA015. Summit, #AVA016. Wipeout, Fabric Brads: #EMB007. Walk in the Park. I cut them out as strips and adhered them with pop dots for added dimension.

Hope you like what I shared with you today! Until next time!!!Have fun creating,
janis
Monday, August 23, 2010
The new lines...
I'm sure you've drooled...I mean "seen" the new lines from Upsy Daisy Designs. Aren't they fabulous?!
Here's some projects I made with them...
Birthday duo

This page features the new Avalanche line. If you see this line, you'd think masculine page or snowy themed layouts....but not I....I was inspired to use it for a birthday page because of the happy birthday block from one of the papers in the line.

I used my favorite stamp- the shaped journaling block stamp from the My guy collection.

added some Upsy Daisy designs letter rubons onto cardstock and then adhered with pop up dots for more dimension.

this cute block was the inspiration for the page. Added some fabric brads to finish off the page.
and then I used Kim's wonderful sketch to jumpstart these two cards featuring the new Home Sweet Home line...
Hearts can build card

I'm still inlove with the quote strips from the Upsy Daisy designs papers. It made my sentiment a breeze to make. I also added some ribbon that Upsy Daisy Designs are now offering. Plus a brad from the Enchanted line.

I handcut the house image from pattern paper.
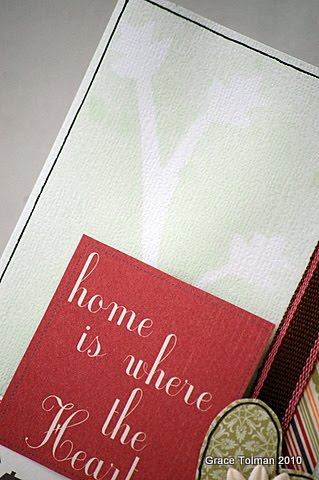
Home is where the Heart is card

I used strips of papers and some ribbons here. Another handcut sentiment from one of the papers in the line.

I created a subtle image of leaves in the white background using glimmer mist and a die cut shape.

handcut a heart from the same paper line and finished it off with a flower and a brad from the See Ya Later Alligator line.
thank you for stopping by.
-Grace
Here's some projects I made with them...
Birthday duo
This page features the new Avalanche line. If you see this line, you'd think masculine page or snowy themed layouts....but not I....I was inspired to use it for a birthday page because of the happy birthday block from one of the papers in the line.
I used my favorite stamp- the shaped journaling block stamp from the My guy collection.
added some Upsy Daisy designs letter rubons onto cardstock and then adhered with pop up dots for more dimension.
this cute block was the inspiration for the page. Added some fabric brads to finish off the page.
and then I used Kim's wonderful sketch to jumpstart these two cards featuring the new Home Sweet Home line...
Hearts can build card
I'm still inlove with the quote strips from the Upsy Daisy designs papers. It made my sentiment a breeze to make. I also added some ribbon that Upsy Daisy Designs are now offering. Plus a brad from the Enchanted line.
I handcut the house image from pattern paper.
Home is where the Heart is card
I used strips of papers and some ribbons here. Another handcut sentiment from one of the papers in the line.
I created a subtle image of leaves in the white background using glimmer mist and a die cut shape.
handcut a heart from the same paper line and finished it off with a flower and a brad from the See Ya Later Alligator line.
thank you for stopping by.
-Grace
Labels:
Avalanche,
Enchanted,
Home Sweet Home,
See You Later Alligator
Tuesday, August 17, 2010
Home Sweet Home!
Have you seen those gorgeous little "Home" themed cards and wrapping papers that have been put out for Christmas this year? They look like they straight out of a children's storybook and I am in seriously in love with them. It made me think about how I could achieve the same look using the new Upsy Daisy range of "HOME SWEET HOME" papers.
Measure out your cardstock at 1cm widths - you need about 20 - 30 picket fence palings, depending on how long you want your fence. Each fence paling also needs to be 8cm tall
Either use your exacto knife or a pair of scissors to cut each fence paling up into the cardstock.


Here's a couple of Step by Step pictures with instructions on how to create a paper pieced Picket Fence to embellish your page - perfect for pages about your home, a friend's new house, the family pet or - like I have done, a new baby.
How to create your own Picket Fence!
You need:
plain cardstock or thick paper
metal ruler
exacto knife and scissors
pencil
Measure out your cardstock at 1cm widths - you need about 20 - 30 picket fence palings, depending on how long you want your fence. Each fence paling also needs to be 8cm tall
Either use your exacto knife or a pair of scissors to cut each fence paling up into the cardstock.

Add some puffy mounting tape to the back of each fence paling.

Adhere your fence to your layout over the top of two thin strips of paper (to act as the back fence rungs).
And here is the finished layout - celebrating the safe arrival of my god-daughter Sophia :).
I have also created this card using the fence paling idea - this would be great to use for someone you know who is moving into a new home:
Have fun and happy creating everyone!

Adhere your fence to your layout over the top of two thin strips of paper (to act as the back fence rungs).
And here is the finished layout - celebrating the safe arrival of my god-daughter Sophia :).I have also created this card using the fence paling idea - this would be great to use for someone you know who is moving into a new home:

Lots of love from Australia,
Sarah xx
Monday, August 9, 2010
Slip Sliding with the new "Avalanche" papers from UDD!
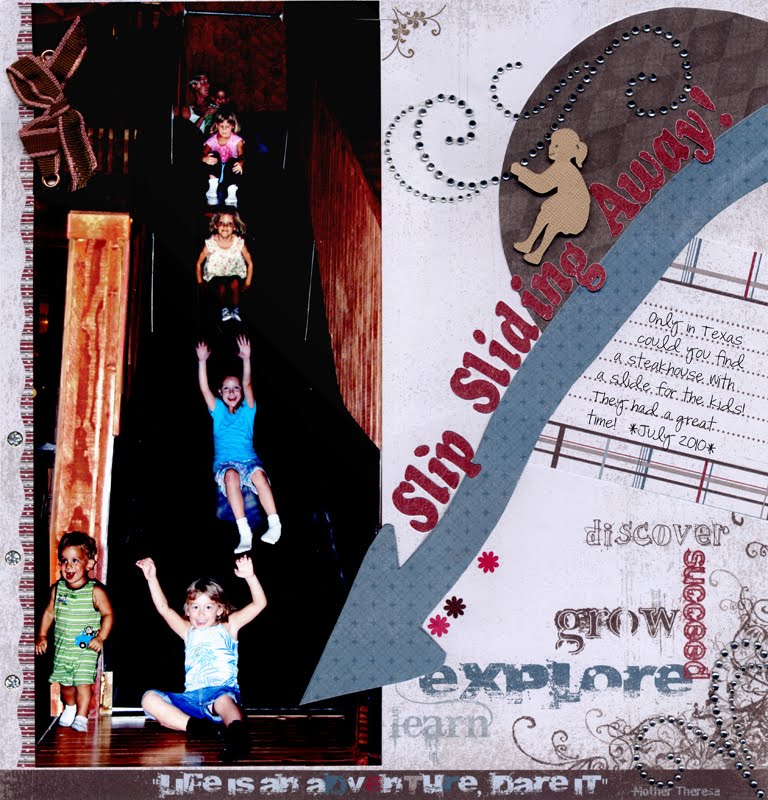
One of the things I love about the new "Avalanche" line by Upsy Daisy Designs is that it is so versatile. Sure, there is a snowflake paper, but there are also great stripes, plaids, and patterns! It's really about scrapping an adventure....
We visited Texas this summer to spend time with my two sisters, their children, and my parents. We went to a steak house (of course!) and what did we find? A big SLIDE! The kids were thrilled. I edited a lot of the pictures in Photoshop so I could put all of our kids on the slide at the same time. Hope you have fun looking at my results!
UDD Products Used: Avalanche Papers, rub-ons, and ribbon.
We visited Texas this summer to spend time with my two sisters, their children, and my parents. We went to a steak house (of course!) and what did we find? A big SLIDE! The kids were thrilled. I edited a lot of the pictures in Photoshop so I could put all of our kids on the slide at the same time. Hope you have fun looking at my results!
UDD Products Used: Avalanche Papers, rub-ons, and ribbon.
Subscribe to:
Posts (Atom)